NOT ON THE BID LIST
One of the most common issues I hear about is “It’s telling me I’m not on the bid list” This can happen for a couple of reasons. To narrow down why, try logging into crewbids in your browser. (crewbids.__thecompanysite__.com) once you’re at the main page, navigate to “Reports” then click “View Other Bids”. From there, make note of your name and position as indicated below the white line. Are they correct? Now select the option circle for “Captain Bids” or “First Officer Bids” as appropriate. Then click on “Select Name” and look for your name. If your name does not appear in the list when it should OR it appears out of seniority order, then the problem lies on the company side. If your name appears correctly in the list then there may be something Blastro hasn’t encountered before. Please report this to me by selecting “Email Support” in the help menu, or emailing help@snizware.com
Blastro requires Google Chrome to work properly
Manually updating lines and bids files:
NOTE: THE MOST RECENT UPDATE SHOULD PREVENT YOU FROM HAVING TO PERFORM THIS PROCEDURE BUT IN CASE YOU STILL WANT TO TRY THIS:
Recently, multiple revisions to the files went out causing big issues reading the files. If you’re tech savvy enough and want to manually copy in the correct files, then feel free. To do it, navigate to the appropriate application folder. On windows, press Windows Key+R to open the run dialogue and type %appdata%\Blastro in it. Press enter and you’ll get to the program storage folder. On Mac you can acess the folder by opening Finder and pressing Command+Shift+G. Type: ~/Library/Application Support/Blastro and press return. If you remove lines.pdf and trips.pdf by highlighting them and pressing delete or dragging them to the trash, then copy in the appropriate file from an email attachment and rename the file (press F2 to rename a file in Windows, and on Mac simply press return) lines.pdf or trips.pdf as appropriate, you will be able to force Blastro to read the correct file. This process should not be necessary as long as the files are posted to the bidding website. If you do perform this, do not have it update the lines file automatically when it prompts you to or the file will revert to the version from online again.
Pay Form creation:
If you are experiencing any trouble with pay form creation, then I recommend selecting “Purge Schedule Data” from the Pay menu first. Ensure Blastro is configured to download the proper month’s schedule data by visiting the “Pay” menu and selecting “Define Pay Month.” Select the Month from the dropdown box, type in your line number, guarantee hours, and click on the days ON you were awarded for that month. Press OK. Save all of the PDF files you have for flight reservations for the month in a folder somewhere. In the “Pay” menu, select “Locate Flight Reservations” and navigate to the folder where you saved them. Note: The files themselves won’t appear in the dialog when you select the folder used. The dialog is only looking for the folder location not a specific file. If desired, check that your resident airport is correct by selecting “Set Resident Airport” in the “Pay” menu. After that, ensure Blastro knows your scheduling login information so it can retrieve your schedule. “Pay” -> “Update Scheduling Password”. Now you can select “Retrieve <Month> Schedule” once again from the “Pay” menu and it should log on and retrieve your schedule. Once it is finished it will tell you how many new duty blocks were retrieved. They can be viewed by selecting “View Retrieved Schedule” which will open the information in a text editor. You may have to resize the text editor horizontally to reveal all of the fields. If you can confirm that the information is correct, then “Fill In Pay Sheet” should work correctly. You will need some sort of spreadsheet software for viewing the resulting form. I recommend LibreOffice for anyone searching for a free solution. I use it for my Mac testing and it works well.
Logbook Export:
Logbook Export is pretty simple from a programming standpoint. If you can use “View Retrieved Schedule” to see what was retrieved, then you shouldn’t encounter any problems exporting your flights. The tricky part is locating the file which gets placed on your desktop, and getting your logbook program to read it properly. The flights are saved as a CSV file which stands for “Comma Separated Values.” Any logbook program that can read CSVs (Most can) will be able to import from here. If you want to see the information being imported, CSV files can be opened in multiple ways. Notepad on the PC and TextEdit on the Mac are the simplest solutions but for a nicer presentation, any spreadsheet software like Excel, LibreOffice, WPS, etc. will also be able to open them.
I can only speak for Logbook Pro since that is what I use, but I have reports that LogTen Pro also successfully opens the exported CSV file.
Logbook Pro: Open the “File” menu and select “Import Wizard…” Click “Comma Delimited”, then “Browse” for the file. From the “Look In” dropdown, select your Desktop and Locate the Flights.csv file and click “Select”. The source format of the flight times can be Hours.Tenths OR HH:mm since Blastro saves duration as well as Block Out and In times. If you have Logbook Pro doing auto-fill, I’ll leave it up to you whether you want to check that or not. I don’t since mine auto-fills the PIC column, and some of the time I’m PIC and sometimes I’m not. It’s just easier to enter it after the fact. In the “Overwrite Mode” selection I highly recommend selecting “Append to Data” and then remove any existing flights in the next screen. Otherwise prior duplicate entries will be replaced in your logbook and any info you’ve already customized for those flights might get overwritten. “Backup Mode” is self explanatory. Click Next. X out any flights you don’t want to import and make sure the “First Row Contains Field Names” is checked. Click Next again. The import columns you want in your logbook should be checked after mapping the import column to a logbook column in the last row where it says “Import Destination”. I recommend saving a template with these options so you don’t have to configure it every time. Otherwise it is almost more work than doing your logbook yourself. Blastro doesn’t log things like Landings, Day/Night Approaches or PIC since it really can’t rely on schedule data to be accurate for that. But the info it gets you started with like duration, dates, airport codes and crew member names saves a lot of work later.
Windows Anti-Virus Problems
If you receive a Windows Defender has protected your computer “Don’t Run” message, it can be bypassed by clicking “More Info” then “Run Anyway”
If your program terminates and the icon disappears, then Defender stopped and removed the executable. For this you must add an exclusion to defender: See the link below.
Link: How to add an exclusion to Windows Defender
The exclusion location is %USERPROFILE%\AppData\Roaming\Blastro You can copy and paste that line in the RUN box by pressing Windows Key+R to get the full path where Blastro is installed. This is the location that needs exclusion in Defender, Norton or whatever doesn’t like my app.
WebRoot Anti-Virus
If you have Webroot and Blastro stops working or won’t install, then do the following to make an exclusion:
Open Webroot SecureAnywhere
Click Settings (Gear Icon) of PC Security.
Click Block/ Allow Files.
Allow ugblastro.exe and blastro.exe (They can be found at C:\ProgramData\Blastro\)
Additionally, you can add an exclusion for the entire Blastro app folder with the following steps:
Open a Windows file explorer folder view and under the “View” tab, check Hidden Items
go back to Webroot, and enter the Advanced Exclusion settings. Choose the C:\Users\[your username]\App Data\Roaming\Blastro folder and click Select. (Additionally select C:\ProgramData\Blastro\) You may now close Webroot, and uncheck the Hidden Items checkbox on your folder view. Once again, install Blastro. It should now run without being hampered by Webroot.
Application Crashes on startup:
First, try updating to the newest version if you haven’t already.
If you are still having problems where the program won’t even start, and you are comfortable doing so, you may navigate to the program folder and remove the blastro.dat file and/or the lines.xlsx, FO_ViewAllBids.xls, and CA_ViewAllBids.xls
The program files are stored in the following folders:
On Windows: Press Windows Key+R then type %USERPROFILE%\AppData\Roaming\Blastro and click OK
“5760” PermissionError
One user who experienced this error reported that the fix was to remove the program as mentioned in the “Completely Removing Blastro” section. Then, reinstall and enter your Serial Number but DO NOT GO ONLINE AND REFRESH. Close down Blastro, then reopen it and go online and download the Lines and Bids. The following procedure to remove and reinstall has ben revised to alleviate this possibility.
Completely Removing and Reinstalling Blastro:
If simply uninstalling isn’t working for you, or you think there might be residual files left over that need to be cleaned up, do the following to remove everything that might still exist before you reinstall:
PC/WINDOWS
Here’s how: Press the Windows Key + R to open the run dialog.
Type: appwiz.cpl and press ENTER
Select Blastro then click UNINSTALL
Once it uninstalls, Press Windows Key + R again.
This time type: %appdata% and press enter
A folder should appear. Find Blastro in the list. Highlight it (click once) and press DEL.
You can now close all open windows.
Ensure you have Google Chrome installed
Download Blastro and install.
If your Anti-Virus gives you troubles, follow the directions above to add an anti-virus exclusion for your specific Anti-Virus (and possibly Windows Defender)
Allow chromedriver to download but DO NOT REFRESH THE BIDS YET – Select NO if it asks.
Enter your serial number and then QUIT THE PROGRAM! (One user reported he had to do this to prevent an error later)
Restart Blastro and Refresh the bids.
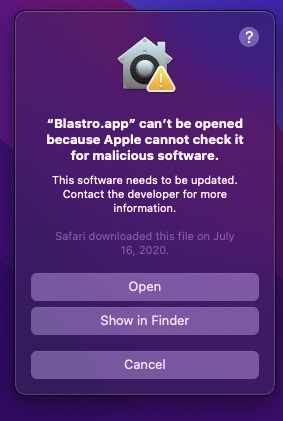
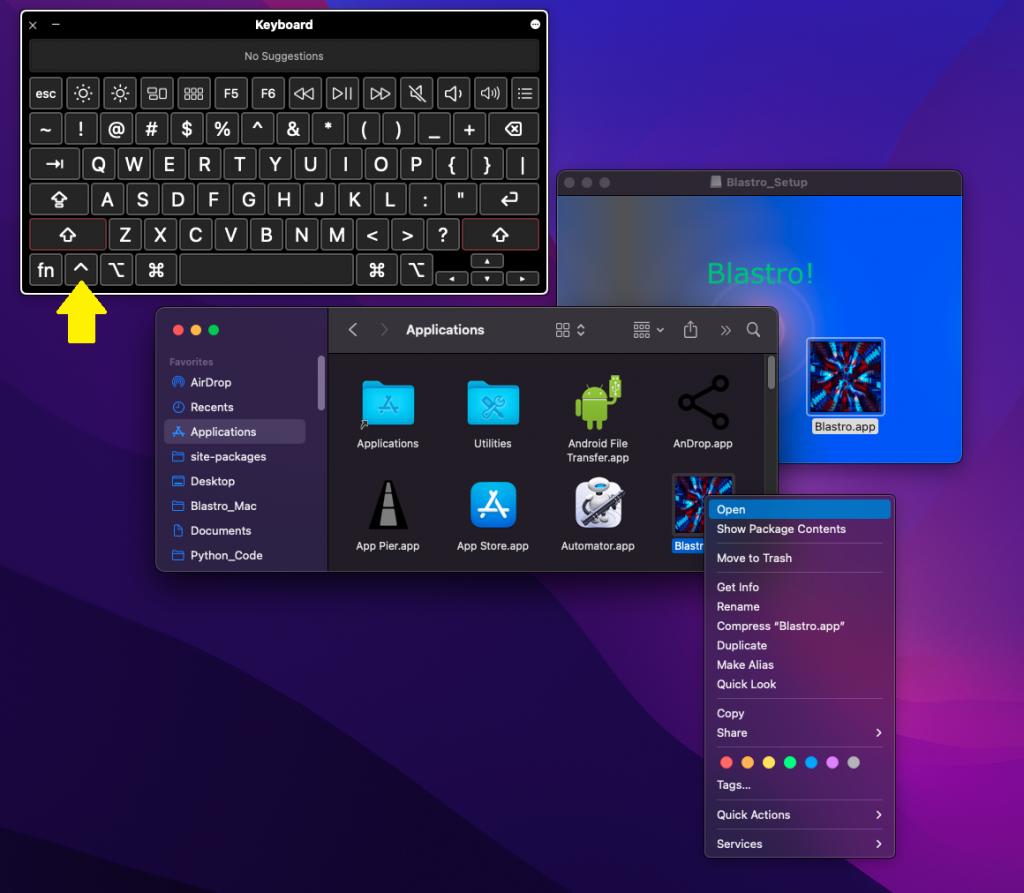
Mac Instructions: The simple solution to most of the Mac warnings you receive is to hold CONTROL down while you’re clicking on the program to reveal the “OPEN” button. More detailed instructions are below:
First of all, Mac does a great job of explaining their own painful process… (Click here to read Apple’s answer)
To install or update Blastro: Navigate to the downloads section and choose the appropriate installer for your system.
Once the download completes, CLOSE YOUR BROWSER. Open a Finder window and navigate to “Downloads”. If you open it from your browser, and you receive an error about an untrusted developer or unable to check for malicious software, you CANNOT resolve it from here. You must close your browser and follow the next few steps.
Once you locate your downloads folder in ‘Finder’, locate the most recent Blastro Update file. Removing all of the old ones before downloading makes this much easier to find. Double click the blastro_setup.dmg file.
Untrusted / Unverified Developer error:
In FINDER, hold CONTROL and click on the installer. Choose “Open” and/or “Open Anyway”
This will put a Drive Icon called “Blastro Setup” on your desktop. Open it up and you’ll see a Blue Blastro Icon with an arrow to Applications. Drag the Blastro icon to Applications to install. If you need to open your Applications folder in Finder, you can select “New Finder Window” from the dropdown menu and click “Applications” on the left pane. When running Blastro for the first time you will most likely receive a permissions error due to the fact that I am not an official Apple developer. To bypass this message, hold CTRL when you click the Blastro icon and choose ‘Open’. Another prompt will appear allowing you to hit “Open” again which will then run the program.
DAMAGED FILE:
If you receive a subsequent error that the file is “Damaged” it can be resolved by opening Terminal and typing the following two commands and pressing <ENTER> after each: (Ensure all spaces and capitals match)
NOTE: THERE IS A SPACE AFTER ‘cd’
cd /Applications
xattr -cr Blastro.app
Once you do this, open Launcher and run Blastro normally. Sometimes it takes quite a few seconds to launch. Please be patient if it seems like nothing is happening.
To access the folder where the program’s data files reside, open Finder and press Command+Shift+G. Then type:
~/Library/Application Support/Blastro and press return.
Completely Removing and reinstalling if you have big issues:
Open Finder
Press Command+Shift+G
Type: ~/Library/Application Support/Blastro
Delete/Drag all the files in the Blastro folder to the trash
Ensure you have Google Chrome installed
Download Blastro and install as shown above
Run Blastro
Allow chromedriver to download
Input your serial number
Refresh the bids.